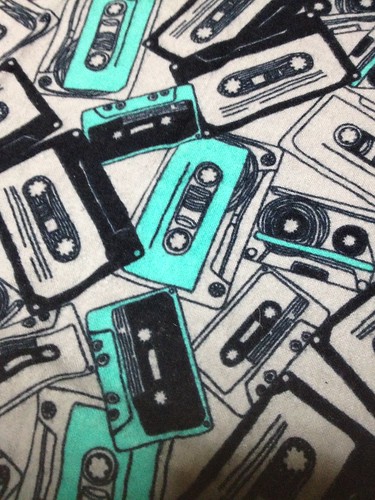
After making a scoodie for my husband with lining in a flannel covered with cassette tapes, I jokingly asked if he'd wear a button-up shirt with the same print. Surprisingly, he said yes. So off I went back to Joann to find this flannel... to my dismay it was no longer available. However, the nearest Joann is only 1 mile away so I stop there frequently just to browse and get other needed items. One day, I was walking through the aisles, and what do I find... the exact print again! It was no longer on sale for $2.79/yd at which I bought it for the scoodie; however, I still had a coupon was able to get it for $3.50/yd and so it began...
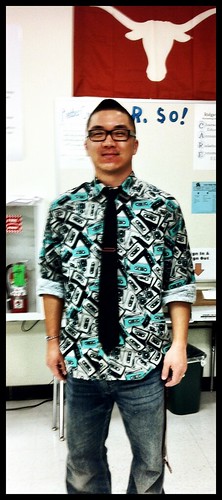
This particular version is his wearable muslin. He actually wore it to work the day after I finished sewing on the buttons for "Dress Like a Celebrity Day" (he's a teacher)... he was dressing like Russell Westbrook who apparently wears some crazy shirts and thick lens-less glasses. (We are OKC Thunder fans and went to Texas hence the Longhorn in the picture!) Haha... it still had yellow pencil markings for the buttonholes and buttons but I'm sure no one will even notice with the loud print. What do you think... did he dress like Russell Westbrook?
On to the project details:
Pattern: Kwik Sew 2777 (no longer on the website)
Size: Medium (default 15 1/2" collar)
Fabric: 100% Cassette Tape cotton flannel from Joann
Cost: $11.79 (pattern) + $10.50 (fabric 3 yd @ $3.50/yd)
What I Love: That the pattern has a collar stand and the fabric is so much fun!
Notes:
- Decreased sleeve length by 2"
- All raw seams are enclosed except for sleeves and side seams
- Sew carefully and make sure collar stand and cuffs incase all seams... my collar stand is a little off... which I need to go back and fix.
Future versions:
- Adjust collar size to be 16"
- Flat fell side seams and sleeves (need to make seam allowance 5/8" instead of 1/4")
- Research placket insertion techniques
- If making a slim fit version, will need to add darts or some sort of shaping
- Label the under collar so it doesn't get attached upside down
- Try convertible cuffs
- Reference Shirtmaking by David Page Coffin
Overall:
Instructions are pretty easy to follow along... just need to pay attention on the yoke attachment because the first few times I read it I was like "Wha???". Also, I noticed that the collar corners were flipping up and didn't know why. Miss Lulu, who is also mentioned on Susan's blog, noticed amongst the busy print that my undercollar was stitch as the top so note to self to label the under collar! This will be my go-to button-up (button-down?) shirt pattern for him. I have fabric that has been in my stash that was bought with the intention of making him shirts, and I'm finally getting around to it. Making these types of shirts take time and precision sewing so not sure when I'll get around to the next one. :P Sorry, hon!
This sounds awesome. We need a picture!
ReplyDeleteI love that print! Now I want to make a shirt for MY husband too, and then they can be twinsies.
ReplyDeleteI love it, too~! Hehe... we should make some for ourselves, too!
Delete